![]()
KVM (Kernel-based Virtual Machine) is a virtualization infrastructure for the Linux which requires a processor with hardware virtualization extension to be able to host guest sytems. KVM is convenient solution to test and try different operating systems if you don’t have a possibility to purchase expensive and power consuming physical hardware.
The below tutorial presents KVM (QEMU) installation and setup along with Linux Bridge configuration on CentOS7 / RedHat7 operating system.
Steps:
1. Verify CPU Hardware Virtualization support
Our CPU must support hardware virtualization (VT-x) in order to become KVM Hypervisor and host Virtual Machines (guest operating systems):
[root@tuxfixer ~]# lscpu
Architecture:          x86_64
CPU op-mode(s):        32-bit, 64-bit
Byte Order:            Little Endian
CPU(s):                4
On-line CPU(s) list:   0-3
Thread(s) per core:    2
Core(s) per socket:    2
Socket(s):             1
NUMA node(s):          1
Vendor ID:             GenuineIntel
CPU family:            6
Model:                 42
Model name:            Intel(R) Core(TM) i5-2520M CPU @ 2.50GHz
Stepping:              7
CPU MHz:               800.000
BogoMIPS:              4988.58
Virtualization:        VT-x
L1d cache:             32K
L1i cache:             32K
L2 cache:              256K
L3 cache:              3072K
NUMA node0 CPU(s):     0-3
2. Disable and stop NetworkManager
NetworkManager is known to cause problems when working with Linux Bridge, so for us it’s better to disable it:
[root@tuxfixer ~]# systemctl stop NetworkManager
[root@tuxfixer ~]# systemctl disable NetworkManager
Removed symlink /etc/systemd/system/multi-user.target.wants/NetworkManager.service.
Removed symlink /etc/systemd/system/dbus-org.freedesktop.NetworkManager.service.
Removed symlink /etc/systemd/system/dbus-org.freedesktop.nm-dispatcher.service.
3. Install KVM related packages
[root@tuxfixer ~]# yum install qemu-kvm qemu-img libvirt libvirt-python libvirt-client virt-install virt-viewer virt-manager4. Launch and enable libvirtd daemon
[root@tuxfixer ~]# systemctl enable libvirtd
[root@tuxfixer ~]# systemctl start libvirtd
5. Set system-wide privileges for KVM
We need to add our regular user tuxfixer to kvm group to let him launch virt-manager
[root@tuxfixer ~]# usermod -a -G kvm tuxfixerWe also need to set polkit (policy kit) rules for KVM.
Edit file 49-polkit-pkla-compat.rules:
[root@tuxfixer ~]# vim /etc/polkit-1/rules.d/49-polkit-pkla-compat.rulesand add the following ath the bottom:
polkit.addRule(function(action, subject) {
    if (action.id == "org.libvirt.unix.manage" &&
        subject.isInGroup("kvm")) {
            return polkit.Result.YES;
        }
});
6. Create KVM Linux Bridge (bridge KVM hypervisor host network interface with VM network interfaces)
In this tutorial we want Virtual Machines to obtain their IP addresses from the same network where KVM Hypervisor host is connected, that’s why we will bridge it’s main network interface (em1) with VM network interfaces. To do so, we need to create Linux Bridge from em1 interface on KVM Hypervisor host.
Current Hypervisor network configuration (right after KVM installation):
[root@tuxfixer ~]# ip a
1: lo:  mtu 65536 qdisc noqueue state UNKNOWN
    link/loopback 00:00:00:00:00:00 brd 00:00:00:00:00:00
    inet 127.0.0.1/8 scope host lo
       valid_lft forever preferred_lft forever
    inet6 ::1/128 scope host
       valid_lft forever preferred_lft forever
2: em1:  mtu 1500 qdisc pfifo_fast state UP qlen 1000
    link/ether d0:67:e5:33:15:3f brd ff:ff:ff:ff:ff:ff
    inet 192.168.2.3/24 brd 192.168.2.255 scope global dynamic em1
       valid_lft 73193sec preferred_lft 73193sec
    inet6 fe80::d267:e5ff:fe33:153f/64 scope link
       valid_lft forever preferred_lft forever
3: wlp3s0:  mtu 1500 qdisc noop state DOWN qlen 1000
    link/ether 00:24:d7:f4:dc:e8 brd ff:ff:ff:ff:ff:ff
4: virbr0:  mtu 1500 qdisc noqueue state DOWN
    link/ether 52:54:00:b7:22:b3 brd ff:ff:ff:ff:ff:ff
    inet 192.168.122.1/24 brd 192.168.122.255 scope global virbr0
       valid_lft forever preferred_lft forever
5: virbr0-nic:  mtu 1500 qdisc pfifo_fast master virbr0 state DOWN qlen 500
    link/ether 52:54:00:b7:22:b3 brd ff:ff:ff:ff:ff:ff
ifcfg-em1 config file (before KVM Linux Bridge creation):
[root@tuxfixer ~]# cat /etc/sysconfig/network-scripts/ifcfg-em1
DEVICE="em1"
TYPE="Ethernet"
BOOTPROTO="none"
NAME="em1"
ONBOOT="yes"
HWADDR="D0:67:E5:33:15:3F"
IPADDR=192.168.2.3
PREFIX=24
GATEWAY=192.168.2.1
PEERDNS="no"
NM_CONTROLLED="no"
For KVM networking configuration we will use virt-manager application which is a user-friendly GUI frontend for KVM command line interface.
Note: virbr0 interface was created automatically along with KVM installation and represents virtual network existing “inside” KVM environment with NAT (Network Address Translation) enabled.
Since we don’t need NAT inside KVM environment (we want to bridge Hypervisor interface), we can remove existing KVM virtual network based on virbr0 interface.
Launch virt-manager as root:
[root@tuxfixer ~]# virt-manager…virt-manager window should appear:

Right click: QEMU/KVM -> Details -> Virtual Networks -> Disable network: “default” -> Delete network: “default” based on virbr0

Now we can bridge KVM Hypervisor interface (em1):
Right click: QEMU/KVM -> Details -> Network Interfaces -> Add Interface:
Interface type: Bridge
Interface name: br-em1
Start mode: on boot
Activate now: enabled
IP settings: copy configuration from ’em1′
Bridge settings: STP on, delay 0.00 sec
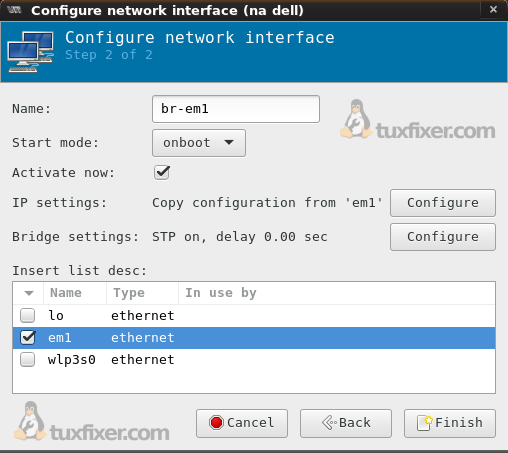
… press Finish to override the existing configuration and create KVM Linux Bridge.
Now we can verify newly created Linux Bridge (br-em1):
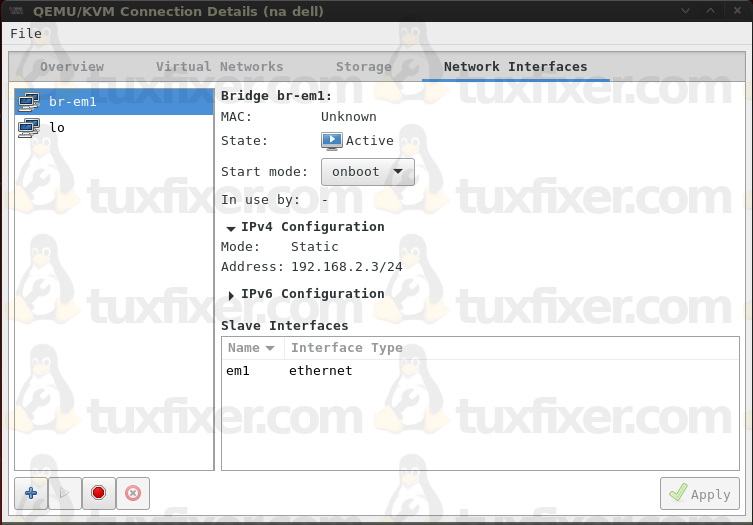
Check current IP configuration (IP is now assigned to br-em1 and em1 acts now as backend interface only):
[root@tuxfixer ~]# ip a
1: lo:  mtu 65536 qdisc noqueue state UNKNOWN
    link/loopback 00:00:00:00:00:00 brd 00:00:00:00:00:00
    inet 127.0.0.1/8 scope host lo
       valid_lft forever preferred_lft forever
    inet6 ::1/128 scope host
       valid_lft forever preferred_lft forever
2: em1:  mtu 1500 qdisc pfifo_fast master br-em1 state UP qlen 1000
    link/ether d0:67:e5:33:15:3f brd ff:ff:ff:ff:ff:ff
3: wlp3s0:  mtu 1500 qdisc noop state DOWN qlen 1000
    link/ether 00:24:d7:f4:dc:e8 brd ff:ff:ff:ff:ff:ff
6: br-em1:  mtu 1500 qdisc noqueue state UP
    link/ether d0:67:e5:33:15:3f brd ff:ff:ff:ff:ff:ff
    inet 192.168.2.3/24 brd 192.168.2.255 scope global br-em1
       valid_lft forever preferred_lft forever
    inet6 fe80::d267:e5ff:fe33:153f/64 scope link
       valid_lft forever preferred_lft forever
Verify Linux Bridge configuration:
[root@tuxfixer ~]# brctl show
bridge name	bridge id		   STP enabled interfaces
br-em1		8000.d067e533153f  yes		   em1
KVM Linux Bridge is now configured.
7. Further steps – launching VMs
You can proceed now with Virtual Machines installation, you can also launch VMs from already created qcow2 images of VMs if you have those.
If you need Kali Linux qcow2 images, you can check mine here.
cool article
Thank You Janek 😉
WTF all network down – fucking | when finished added new – rewrite existing and down + lose ifcfg-* file WTF
I encountered such situation once on Debian, anyway on CentOS/RHEL it never happened to me, looks like you need to recreate it manualy.
well, it just happened to me on newest CentoOS 7, all interfaces are down 😉 Now just need to go 40 miles to access machine locally. Better do this when being around the host, rather than remotely.
I needed STP to be off, I suppose it depends on the switch.
Never do remote network configuration unless you have remote ILO/IPMI access if you can avoid it.
Perhaps you forgot to disable Network Manager which is it should?
Best KVM on CentOS 7 installation article so far and I have checked at least three to four articles, including one posted by Dell engineer since I’m using Dell PowerEdge T110 as host.
Its taken 5 months to land on this gem. Thank you
You are welcome 🙂
When the bridge is configured is the regular network interface for the host become unusable?
Hi Dan
The regular interface acts only as backend device for the bridge, but should be enabled all the time. IP is transferred from this interface to the bridge, but the interface is still working, you can even capture packets from this device using tcpdump/Wireshark.
Perfect b/c it’s right to the point. duckcuckgo sent me here btw!
Awesome article, working great for multi bridge.
Thank you very much Grzegorz Juszczak.
+1
Thank you so much, this article has been brilliant!! Finally it works pretty good.
now that the host network has no ip, if I want to ssh into the host machine how do I do that
After moving the IP address from backend interface to the bridge, you just connect to the bridge via SSH, IP address in fact doesn’t change.
Nice article. For me it works until I reboot the host machine. Is this configuration persistent? If not, how to make it survive a reboot?
Hi Launder
This configuration is definitely persistent after reboot. There is no magic here, it’s simple Linux bridge.
Can you bridge the wireless network as well in the same manner?
Never tried bridging wi-fi interface, but I guess it should be possible, in the same manner
Does this solution allow the guest and host to directly communicate over the primary subnet? This isn’t supported in macvtap.
Hi GregM
If by writing “primary subnet” you meant the management network, then yes, this solution allows it.
Thanks for this information. it’s been really helpful. However, I configured bridged network just like you mentioned in your article and i tried doing a live migration of a guest VM from one host to another, see below the error i was getting:
“Unable to migrate guest: Unable to get index for interface em1: No such device”
what could the problem be?
Hi Victor
The problem is described in the message you are getting 🙂
Looks like you are trying to make a bridge on the interface which doesn’t exist in your OS.
I am using em1 interface, because this is my main access interface for KVM vHost, and this is the interface I am bridging for my VMs – it’s just an example.
Your vHost interfaces most likely have a different names.
You should know which interface you are going to bridge, prior to KVM bridge setup.
Hi Grzegorz,
Coincidentally, my NIC on the source host is also em1. it’s configured with an IP of 10.10.10.164/24 since my environment is on 10.10.10.0/24 network.
my NIC on the target host is eno1 configured with an IP of 10.10.10.240/24.
My guest VM ip is 10.10.10.165/24.
I tried doing live migration, it wasn’t working. it was giving the error i mentioned in the above comment. I then created another VM and used NAT option which gave my VM an IP of 192.168.122.252, after which i was able to do live migration.
I want my VM to use 10.10.10.165 and be able to migrate live and not 192.168.122.252. 192.168….. is not defined in my network environment. How do i go about it please?
Very helpful! Cheers!
Hi Grzegorz, thanks a bunch for this write-up! It saved me quite some hassle, and I’d echo some comments above – yours is probably the best on the Web to date.
I’d like to keep my server on DHCP, thus I can set all IPs from a single place – my router. Unfortunately, after rebooting the server I had to run dhclient manually in order to get the IP. Any thoughts?
Once I followed all the instruction I also added:
GATEWAY=192.168.1.1
to the /etc/sysconfig/network-scripts/ifcfg-br-eno1 file. IP address and i/f name may differ. Then I did:
# service network restart
That allowed proper routing on the host.