![]()
Typical OpenStack cloud setup consists of more than one node (usually one Controller node and several Compute nodes), which requires lot of physical computers / servers available to perform the installation. This complicates the situation, especially if we need to test OpenStack on many nodes. Fortunately we can use Linux KVM (Kernel-based Virtual Machine) to create OpenStack on virtual nodes and avoid problems with obtaining physical hardware.
In this tutorial we will show you how to install OpenStack on KVM on Fedora 21 based hypervisor. We will run Openstack installation on two KVM based virtual nodes (Controller and Compute).
The most important part in configuring KVM for OpenStack installation is network setup, we also need to secure some resources (VCPUs, RAM, disk space) on KVM Hypervisor to create two virtual nodes.
KVM Host (Hypervisor) details:
OS: Fedora release 21 (Twenty One)
VCPUs: 2
RAM: 4GB
disk space: 40GB (for virtual nodes)
eth interface: p37p1
IP: 192.168.2.9
network: 192.168.2.0/24
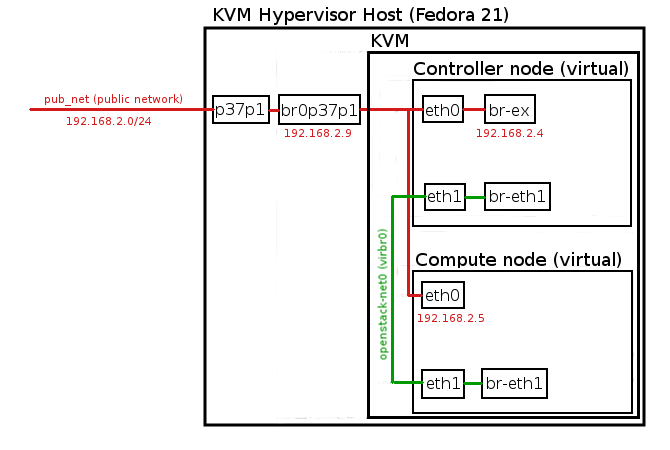
KVM Environment:
bridged interface: br0p37p1 (used for OpenStack pub_net)
physical slave interface: p37p1
isolated net virtual bridge: virbr0 (used for Openstack priv_net)
storage pool: 40GB (for virtual nodes)
Steps:
1. Create Linux bridge from physical interface
We need to create bridge from physical interface p37p1 to let virtual OpenStack nodes in KVM communicate with external network. This Bridge will be attached to KVM OpenStack public network: pub_net. pub_net will be attached to 1st interface (eth0) on each virtual node.
Log in as root, launch virt-manager:
[root@tuxfixer ~]# virt-managerIn virt-manager GUI right click: localhost (QEMU) -> Details -> Network Interfaces -> (+) Add Interface -> Bridge -> Forward:
Enter Bridge parameters:
Interface name: br0p37p1
Interface type: Bridge
Start mode: none
Activate now: Enable
IP settings: Copy configuration from p37p1 interface (192.168.2.9)
Bridge setting: STP on, delay 0.00 sec
Interface to bridge: p37p1
Click Finish Button.
Created Bridge interface should look like below:
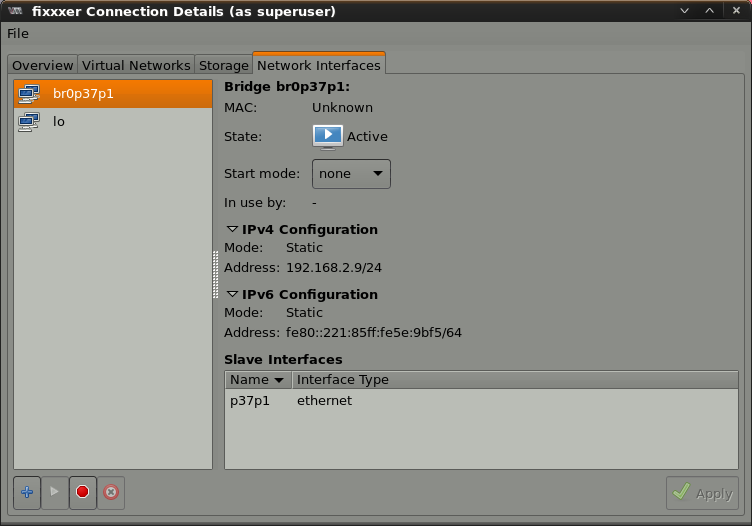
Note: Creating Bridge by means of virt-manager is probably fastest and easiest way of creating Linux Bridge. You could also create Linux Bridge by editing ifcfg-* files in /etc/sysconfig/network-scripts/ directory, but this is more complicated and not in scope of this article.
2. Create isolated Virtual Network
Let’s create Virtual Network, which will be used as OpenStack internal network: priv-net. This network is isolated from outside world and its purpose is to provide physical connection (Carrier, ISO/OSI Layer 2: Data Link) between virtual nodes in OpenStack. This network will be attached to 2nd interface (eth1) on each virtual node to provide an exchange of messages (Message Broker: AMQP, QPID) between them. It doesn’t need IP space assignment for OpenStack to work properly, we assigned it IP notification: 192.168.32.0/24 for troubleshooting purpose only, you can assign it any network you want. Along with Virtual Network creation, KVM will create virtual bridge: virbr0.
In virt-manager GUI right click: localhost (QEMU) -> Details -> Virtual Networks -> (+) Add Network:
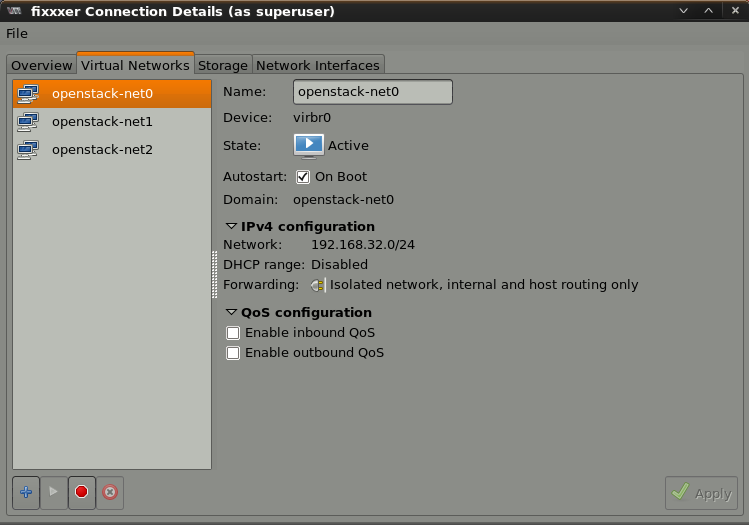
Enter Virtual Network parameters:
Network name: openstack_net0
IPv4 space definition: 192.168.32.0/24
Enable DHCPv4: Disable
Enable Static Route Definition: Disable
IPv6 space definition: Disable
Connection to physical network: Isolated Virtual Network
IPv6 Internal Routing: Disabled
DNS Domain Name: openstack_net0
Click Finish Button.
Created Virtual Network should look like below:
3. Verify network setup on KVM Hypervisor
Verify, that Linux Bridge (br0p37p1) and isolated network Virtual Bridge (virbr0) were created successfully:
[root@tuxfixer ~]# ip a
1: lo:  mtu 65536 qdisc noqueue state UNKNOWN group default
    link/loopback 00:00:00:00:00:00 brd 00:00:00:00:00:00
    inet 127.0.0.1/8 scope host lo
       valid_lft forever preferred_lft forever
    inet6 ::1/128 scope host
       valid_lft forever preferred_lft forever
2: p37p1:  mtu 1500 qdisc pfifo_fast master br0p37p1 state UP group default qlen 1000
    link/ether 00:21:85:5e:9b:f5 brd ff:ff:ff:ff:ff:ff
    inet6 fe80::221:85ff:fe5e:9bf5/64 scope link
       valid_lft forever preferred_lft forever
3: br0p37p1@NONE:  mtu 1500 qdisc noqueue state UP group default
    link/ether 00:21:85:5e:9b:f5 brd ff:ff:ff:ff:ff:ff
    inet 192.168.2.9/24 brd 192.168.2.255 scope global br0p37p1
       valid_lft forever preferred_lft forever
    inet6 fe80::221:85ff:fe5e:9bf5/64 scope link
       valid_lft forever preferred_lft forever
4: virbr0@NONE:  mtu 1500 qdisc noqueue state LOWERLAYERDOWN group default
    link/ether 52:54:00:59:3f:ff brd ff:ff:ff:ff:ff:ff
    inet 192.168.32.1/24 brd 192.168.32.255 scope global virbr0
       valid_lft forever preferred_lft forever
5: virbr0-nic@NONE:  mtu 1500 qdisc pfifo_fast master virbr0 state DOWN group default qlen 500
    link/ether 52:54:00:59:3f:ff brd ff:ff:ff:ff:ff:ff
...
4. Install and launch two KVM Virtual Machines (Nodes) for OpenStack
Both Virtual Nodes based on KVM Virtual Machines must have two network interfaces, one for external connectivity (eth0), second (eth1) for internal communication. For OpenStack Virtual Nodes we will use CentOS 7.0 x86_64 system.
Click on: Create new Virtual Machine and install two Virtual Machines according to the following parameters:
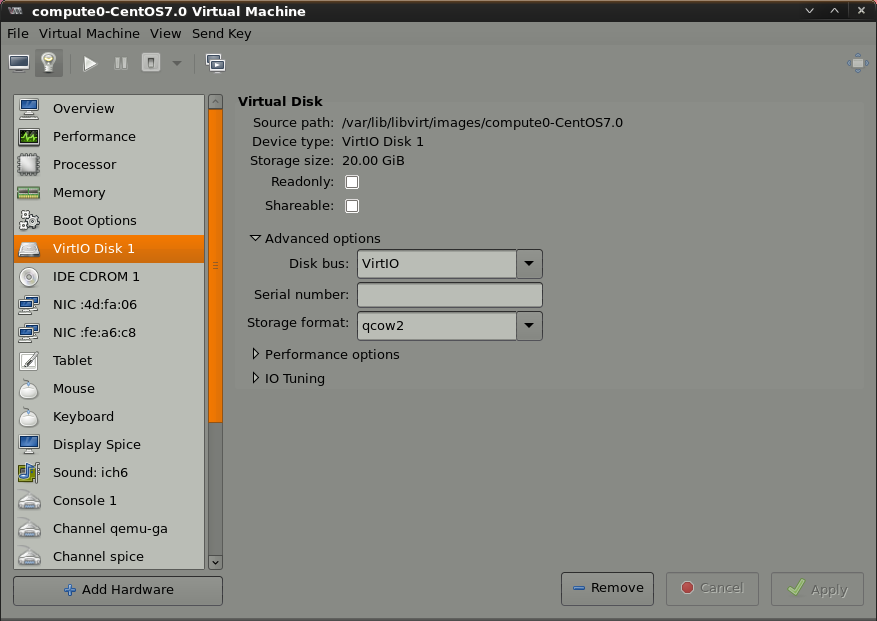
Virtual Machine parameters:
OS: CentOS 7.0 x86_64
VCPU: 1
RAM: 2GB
eth ifaces:
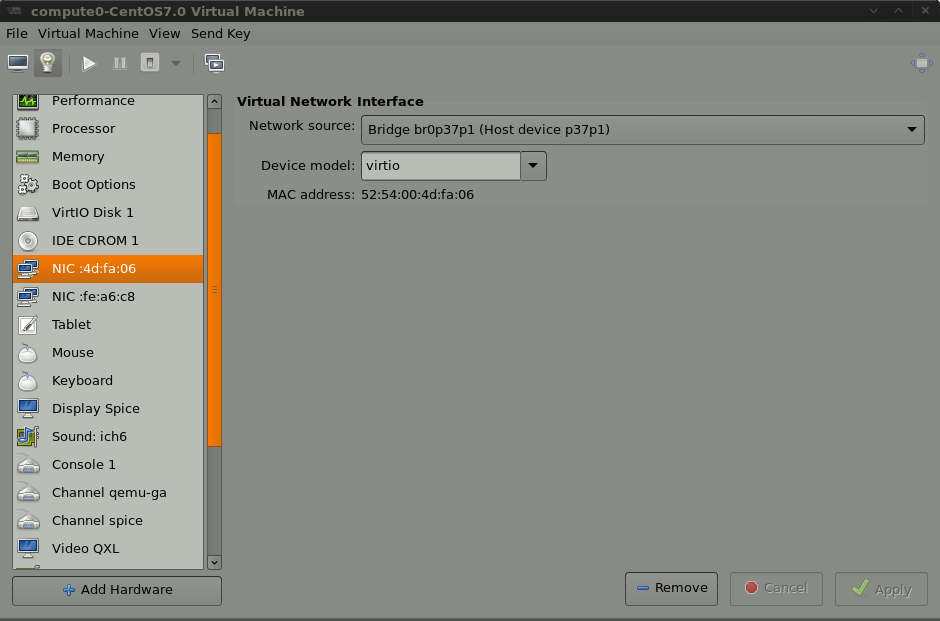
eth0 -> connected to bridge: br0p37p1
eth1 -> connected to isolated virtual network: openstack-net0 (based on virbr0)
virtual disk image: 20GB
Created VMs should look like on the below screens:


After both Virtual Nodes are installed, we can install OpenStack. OpenStack installation on KVM Virtual Machines looks exactly the same as installation on physical hardware nodes. An example OpenStack Juno deployment is described under the following link: OpenStack Installation on CentOS 7 / RHEL 7.
The above
would you explain or demo the multi region in openstack ? It will be great for you followers.
Hi Bobby
Thanx for your request, I will consider it.
link to “OpenStack Installation on CentOS 7 / RHEL 7” is broken
Hi
I corrected the link, thank you for remark.
The link leads to an OpenStack installation based on old and unsupported Juno release, because this is an old article.
If you want a relatively fresh release, refer to the below link regarding Pike release deployment on three nodes:
OpenStack Pike VLAN and Flat network based installation using Packstack.
Don’t forget to extend RAM on the VMs accordingly as a newer release needs more RAM.
I will update these details in the article soon to be more up-to-date.