![]()
OpenStack is quite reliable Cloud solution, that provides extensibility and scalability. That means, if the Cloud is running out of resources for new tenants and instances, it can be easily extended with new Hypervisors (Compute nodes) practically on-line.
In this tutorial we will extend existing OpenStack installation (Controller node, Compute node) with new Compute0 node on-line, without shutting down existing nodes. The easiest and fastest way to extend existing Openstack Cloud on-line is to use Packstack, the automated installer script.
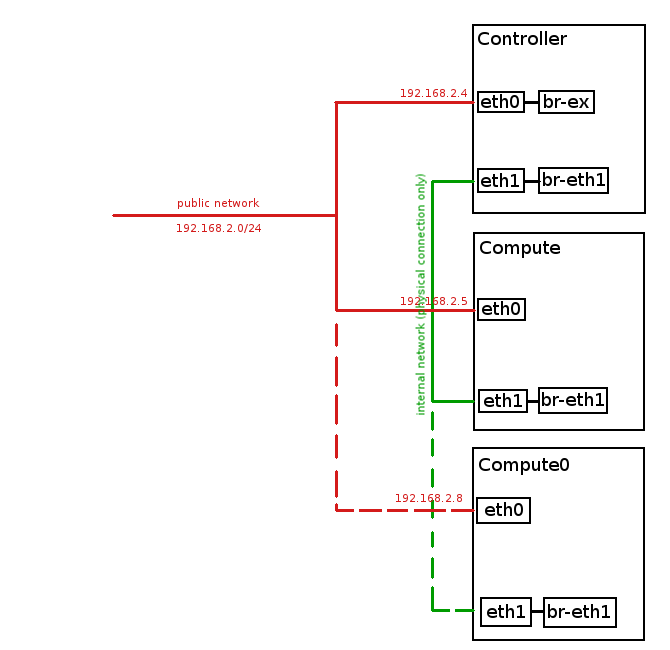
Existing nodes:
Controller node: 192.168.2.4, CentOS7
Compute node: 192.168.2.5, CentOS7
New node:
Compute0 node: 192.168.2.8, CentOS7
Steps:
1. Modify answer file on Controller node
Log in to Controller node as root, backup your existing answers.txt file:
[root@controller ~]# cp /root/answers.txt /root/answers.txt.backupModify following parameters in existing answers.txt file to look like below:
[root@controller ~]# vim /root/answers.txtEXCLUDE_SERVERS=192.168.2.4,192.168.2.5
CONFIG_COMPUTE_HOSTS=192.168.2.5,192.168.2.8Note: Ensure you have set correct IPs in EXCLUDE_SERVERS parameter to prevent existing nodes from being accidentally re-installed!
Here is attached answers.txt file, we used when adding new Compute0 node.
2. Prepare new node for OpenStack deployment
Prepare new hardware:
– install CentOS7 64bit on new hardware
– disable and stop NetworkManager service
– install openstack/juno repository from RDO
Note: check article Install OpenStack Juno on CentOS 7 / RHEL 7 for details on how to prepare node for Openstack deployment.
3. Add new node to existing OpenStack
Add new Compute0 node using Packstack installer script:
[root@controller ~]# packstack --answer-file=/root/answers.txtDeployment of OpenStack on new node may take a while:
Welcome to the Packstack setup utility
The installation log file is available at: /var/tmp/packstack/20151121-205216-By3WFS/openstack-setup.log
Installing:
Clean Up [ DONE ]
root@192.168.2.8's password:
Setting up ssh keys [ DONE ]
Discovering hosts' details [ DONE ]
Adding pre install manifest entries [ DONE ]
Installing time synchronization via NTP [ DONE ]
Preparing servers [ DONE ]
Adding AMQP manifest entries [ DONE ]
Adding MariaDB manifest entries [ DONE ]
Fixing Keystone LDAP config parameters to be undef if empty[ DONE ]
Adding Keystone manifest entries [ DONE ]
Adding Glance Keystone manifest entries [ DONE ]
Adding Glance manifest entries [ DONE ]
Adding Cinder Keystone manifest entries [ DONE ]
Checking if the Cinder server has a cinder-volumes vg[ DONE ]
Adding Cinder manifest entries [ DONE ]
Adding Nova API manifest entries [ DONE ]
Adding Nova Keystone manifest entries [ DONE ]
Adding Nova Cert manifest entries [ DONE ]
Adding Nova Conductor manifest entries [ DONE ]
Creating ssh keys for Nova migration [ DONE ]
Gathering ssh host keys for Nova migration [ DONE ]
Adding Nova Compute manifest entries [ DONE ]
Adding Nova Scheduler manifest entries [ DONE ]
Adding Nova VNC Proxy manifest entries [ DONE ]
Adding OpenStack Network-related Nova manifest entries[ DONE ]
Adding Nova Common manifest entries [ DONE ]
Adding Neutron API manifest entries [ DONE ]
Adding Neutron Keystone manifest entries [ DONE ]
Adding Neutron L3 manifest entries [ DONE ]
Adding Neutron L2 Agent manifest entries [ DONE ]
Adding Neutron DHCP Agent manifest entries [ DONE ]
Adding Neutron LBaaS Agent manifest entries [ DONE ]
Adding Neutron Metering Agent manifest entries [ DONE ]
Adding Neutron Metadata Agent manifest entries [ DONE ]
Checking if NetworkManager is enabled and running [ DONE ]
Adding OpenStack Client manifest entries [ DONE ]
Adding Horizon manifest entries [ DONE ]
Adding Swift Keystone manifest entries [ DONE ]
Adding Swift builder manifest entries [ DONE ]
Adding Swift proxy manifest entries [ DONE ]
Adding Swift storage manifest entries [ DONE ]
Adding Swift common manifest entries [ DONE ]
Adding MongoDB manifest entries [ DONE ]
Adding Redis manifest entries [ DONE ]
Adding Ceilometer manifest entries [ DONE ]
Adding Ceilometer Keystone manifest entries [ DONE ]
Adding Nagios server manifest entries [ DONE ]
Adding Nagios host manifest entries [ DONE ]
Adding post install manifest entries [ DONE ]
Installing Dependencies [ DONE ]
Copying Puppet modules and manifests [ DONE ]
Applying 192.168.2.8_prescript.pp
192.168.2.8_prescript.pp: [ DONE ]
Applying 192.168.2.8_chrony.pp
192.168.2.8_chrony.pp: [ DONE ]
Applying 192.168.2.8_nova.pp
192.168.2.8_nova.pp: [ DONE ]
Applying 192.168.2.8_neutron.pp
192.168.2.8_neutron.pp: [ DONE ]
Applying 192.168.2.8_nagios_nrpe.pp
192.168.2.8_nagios_nrpe.pp: [ DONE ]
Applying 192.168.2.8_postscript.pp
192.168.2.8_postscript.pp: [ DONE ]
Applying Puppet manifests [ DONE ]
Finalizing [ DONE ]
**** Installation completed successfully ******
Additional information:
* File /root/keystonerc_admin has been created on OpenStack client host 192.168.2.4. To use the command line tools you need to source the file.
* To access the OpenStack Dashboard browse to http://192.168.2.4/dashboard .
Please, find your login credentials stored in the keystonerc_admin in your home directory.
* To use Nagios, browse to http://192.168.2.4/nagios username: nagiosadmin, password: 72659a0e75ee4f48
* The installation log file is available at: /var/tmp/packstack/20151121-205216-By3WFS/openstack-setup.log
* The generated manifests are available at: /var/tmp/packstack/20151121-205216-By3WFS/manifests3. Verify new node
Check, if Compute0 node is now included in OpenStack Cloud. Source admin keystone file to import OpenStack admin credentials to your session variables:
[root@controller ~]# source /root/keystonerc_admin Check existing nodes:
[root@controller ~(keystone_admin)]# nova-manage host list
host zone
controller internal
compute nova
compute0 nova Verify, if nova-compute service is running on new Compute0 node:
[root@controller ~(keystone_admin)]# nova-manage service list
Binary Host Zone Status State Updated_At
nova-consoleauth controller internal enabled ':-)' 2015-11-21 22:06:36
nova-scheduler controller internal enabled ':-)' 2015-11-21 22:06:38
nova-conductor controller internal enabled ':-)' 2015-11-21 22:06:37
nova-cert controller internal enabled ':-)' 2015-11-21 22:06:38
nova-compute compute nova enabled ':-)' 2015-11-21 22:06:37
nova-compute compute0 nova enabled ':-)' 2015-11-21 22:06:374. Configure new node
Execute the below commands on Compute0 node only to configure it for internal network traffic.
Create eth1 interface configuration file (if it doesn’t exist):
[root@compute0 ~]# touch /etc/sysconfig/network-scripts/ifcfg-eth1Check MAC address for eth1 interface:
[root@compute0 ~]# ip addr show eth1 | grep link/ether
link/ether 52:54:00:44:74:d7 brd ff:ff:ff:ff:ff:ffModify ifcfg-eth1 file to look like below (put here MAC of eth1 interface):
HWADDR=52:54:00:44:74:d7
TYPE=Ethernet
BOOTPROTO=none
DEVICE=eth1
NM_CONTROLLED=no
ONBOOT=yesEnable eth1 interface:
[root@compute0 ~]# ifup eth1Check, if eth1 interface is now up:
[root@compute0 ~]# ip addr show eth1
3: eth1: mtu 1500 qdisc pfifo_fast master ovs-system state UP qlen 1000
link/ether 52:54:00:44:74:d7 brd ff:ff:ff:ff:ff:ff
inet6 fe80::5054:ff:fe44:74d7/64 scope link
valid_lft forever preferred_lft foreverAdd eth1 interface port to br-eth1 OVS bridge:
[root@compute0 ~]# ovs-vsctl add-port br-eth1 eth1Verify new OVS configuration including eth1 port attached to br-eth1 OVS bridge:
[root@compute0 ~]# ovs-vsctl show
81941570-6478-47b3-b3ed-abb105fe3ff6
Bridge br-int
fail_mode: secure
Port "int-br-eth1"
Interface "int-br-eth1"
type: patch
options: {peer="phy-br-eth1"}
Port br-int
Interface br-int
type: internal
Bridge "br-eth1"
Port "phy-br-eth1"
Interface "phy-br-eth1"
type: patch
options: {peer="int-br-eth1"}
Port "eth1"
Interface "eth1"
Port "br-eth1"
Interface "br-eth1"
type: internal
ovs_version: "2.3.1"Restart network service:
[root@compute0 ~]# systemctl restart network5. Test functionality of new node
To test newly added Compute0 node operability launch an Instance on Compute0 node and check, if it’s getting internal IP address from internal Neutron DHCP server in internal network.
And that’s it, we have just added another Compute node to existing OpenStack Cloud 🙂
Dear Author,
Please can you make a tutorial on how to install three nodes(Compute, Controller, Network) using packstack and also how to create virtual network interfaces.
Thanks in advance
Thank you for your interest 🙂
I will try to make such tutorial soon.
I am also interested to know, how to install OpenStack on three nodes (Compute, Controller, Network) using packstack. Thanks and regards in advance…..
Hi, I am currently working on such tutorial, it should be finished soon.
Here you can find 3 node Openstack installation tutorial:
http://tuxfixer.com/openstack-kilo-3-node-installation-controller-network-compute-on-centos-7/
Thanks Grzegorz Juszczak. I was searching how to add new compute for some time. Is there any other way to do it or this is only way?
Hi Rajesh
In my humble opinion this the easiest and the fastest way, because when you exclude existing servers in answer file packstack doesn’t touch them and adds new nodes only, that’s why you can re-use existing answer file, modify few lines and packstack does the rest of the job for you.
There is also the manual method, it requires manual installation of services on new node (nova, neutron client, amqp, rabbitmq, etc..) and enabling them manually and also modifying some firewall rules – I don’t recommend you this method, but of course it is possible to add new node manually, if you know what you’re doing.
Can you show us or explain us multi region configuration with multi controller node ?
Hi Grzegorz Juszczak,
Thank you for the two node tutorial which gives me the idea to separate the traffic(internal/external). I have only one question. For this tutorial do we need to perform the same steps in additionally added compute network too?????
Hi Grzegorz Juszczak,
I followed the same but node2 is not getting listed in nova service-list, however i can try to run nova service-list command from node2 and it is working fine.
Can you please suggest ?
Regards,
Sandeep
got it resolved myself.. thnx
Hy I have one issue
i am trying to install compute node on other server my controller server IP is 25.80 and other compute node ip i set it ti 25.81
1-yum update-
2-yum install openstack-nova-compute / yum install -y http://rdoproject.org/repos/rdo-release.rpm
3-systemctl disable NetworkManager and systemctl stop NetworkManager
4-yum install -y openstack-packstack
then i modify answer file imported from controller and exclude IP of controller and added IP of compute node
5-packstack –answer-file /root/answers.txt
but i am always stuck at Testing if puppet apply is finished: 25.25.25.81_nova.pp even 48 after 48 hours can anyone please help me
Hey Grzegorz Juszczak,
This is Awesome tutorial …………..thanks ……I have an issue ………please guide me in following:
I have the following nodes:
Controller Node
Network Node
Compute Node 1
Compute Node 2
Please note that I have added “compute node 2” after installing 3 Node Openstack. I am able to successfully launch Instances on both of the compute node but the instance from compute node 1 is able to get an IP from my tenant network and able to ping outside……..but my compute node 2 instance is not getting IP Address from my tenant private network. I am stuck here ……please help me on it.
I want to know what compute node host networking I need to do on compute node 2 like ovs port and ovs bridge.
Waiting for your response ………..thanks in advance ……………:)
Hi Suresh
Sorry for not replying for few days, I was busy.
My guess is that instance on your new Compute 2 node is not getting IP address from DHCP because eth1 interface on Compute 2 node is down and not attached to br-eth1.
To fix the issue try to do the following on your Compute 2 node as root:
1. Create eth1 interface config file:
$ touch /etc/sysconfig/network-scripts/ifcfg-eth1
2. Check your current MAC address for eth1:
$ ip addr show eth1 | grep link/ether
link/ether 52:54:00:44:74:d7 brd ff:ff:ff:ff:ff:ff
3. Modify ifcfg-eth1 file to look like below (put here MAC of eth1 interface):
HWADDR=52:54:00:44:74:d7
TYPE=Ethernet
BOOTPROTO=none
DEVICE=eth1
NM_CONTROLLED=no
ONBOOT=yes
4. Enable eth1 interface:
$ ifup eth1
5. Check if eth1 is now enabled and UP: mtu 1500 qdisc pfifo_fast master ovs-system state UP qlen 1000
$ ip addr show eth1
3: eth1:
link/ether 52:54:00:44:74:d7 brd ff:ff:ff:ff:ff:ff
inet6 fe80::5054:ff:fe44:74d7/64 scope link
valid_lft forever preferred_lft forever
6. Add eth1 port to br-eth1 ovs bridge:
$ ovs-vsctl add-port br-eth1 eth1
7. Verify new OVS configuration:
$ ovs-vsctl show
81941570-6478-47b3-b3ed-abb105fe3ff6
Bridge br-int
fail_mode: secure
Port br-int
Interface br-int
type: internal
Port “qvo97be3eb2-0d”
tag: 1
Interface “qvo97be3eb2-0d”
Port “int-br-eth1”
Interface “int-br-eth1″
type: patch
options: {peer=”phy-br-eth1”}
Bridge “br-eth1”
Port “phy-br-eth1”
Interface “phy-br-eth1″
type: patch
options: {peer=”int-br-eth1”}
Port “eth1”
Interface “eth1”
Port “br-eth1”
Interface “br-eth1”
type: internal
ovs_version: “2.3.1”
8. Restart network
$ systemctl restart network
===
Now restart Instance running on Compute 2 node.
Your instance should now get IP address from neutron DHCP server.
Thank you for your attention and remark, I will add this procedure at the bottom of the post.
BR
Grzegorz Juszczak
Hi Grzegorz,
Could you advice how did you hook up 3 nodes using physical connection for eth1? Thanks in advance
Hi Teik Hooi Beh
I made installation on KVM and for eth1 connections I created virtual isolated network without IP space, this is described in this tutorial:
http://www.tuxfixer.com/install-openstack-on-kvm-how-to-configure-kvm-for-openstack/
check point: 2. Create isolated Virtual Network
In the real environment you can use simple L2 switch just to provide physical connections for eth1 interfaces on nodes.
BR
Grzegorz Juszczak
Thanks. I thought so too. My silly question.
No problem
Hi Grzegorz,
Just to clarify, what communication flows through eth1?
Hi,
it’s internal/tenant network traffic, instances in tenants communicate via eth1 interface, they also get internal IP from DHCP server via eth1 interface.
Hi,
I encountered problem when installing Openstack with Packstack. Do you have idea what is causing the problem and how to fix it?
Copying Puppet modules and manifests [ DONE ]
Applying 192.168.1.133_controller.pp
192.168.1.133_controller.pp: [ ERROR ]
Applying Puppet manifests [ ERROR ]
ERROR : Error appeared during Puppet run: 192.168.1.133_controller.pp
Error: Execution of ‘/usr/bin/rpm -e mariadb-server-10.1.18-3.el7.x86_64’ returned 1: error: Failed dependencies:
You will find full trace in log /var/tmp/packstack/20161202-081630-CPscz3/manifests/192.168.1.133_controller.pp.log
Please check log file /var/tmp/packstack/20161202-081630-CPscz3/openstack-setup.log for more information
Additional information:
* Time synchronization installation was skipped. Please note that unsynchronized time on server instances might be problem for some OpenStack components.
* File /root/keystonerc_admin has been created on OpenStack client host 192.168.1.133. To use the command line tools you need to source the file.
* To access the OpenStack Dashboard browse to http://192.168.1.133/dashboard .
Please, find your login credentials stored in the keystonerc_admin in your home directory.
* To use Nagios, browse to http://192.168.1.133/nagios username: nagiosadmin, password: d5f99954431b4260
Neil
Hi Neil
I had similar problem few times.
You have the root cause written in clear text: “Failed Dependencies”, looks like there are some missing packages, required by the installer.
Try to execute the command manually and check what is the output, this should give you some information:
[root@controller ~]# /usr/bin/rpm -e mariadb-server-10.1.18-3.el7.x86_64
Additionally check given log file names, to see what packages are missing.
Hi Grzegorz,
Did you try connect eth1 for more than 3nodes together? How did you do that if you did?
I connected eth1 directly according to your diagram for 2nodes (controller and compute); everything was okay; and I can ping every IP. But when I added one more compute (controller+2compute), then I can’t connect eth1 ports directly, so I used anther switch (one exist switch was used for connecting all eth0 ports together) for connecting these 3 eth1 ports together. Finally I found I can’t ping instances IP (floating IP) but I can ping virtual router IP.
But, if I recovered the connection of eth1 ports directly each other for 2nodes, I can ping everything: instance IP, router IP, either private IP.
Can you suggest how to connect eth1 ports for over 3 nodes according to your professional experience?
Thank you very much in advance!
Helen
Hi Helen
I tried it few times and it worked for me. But usually I test different OpenStack multinode configurations on KVM environment with virtual networks:
http://www.tuxfixer.com/install-openstack-on-kvm-how-to-configure-kvm-for-openstack/
By the way for internal traffic connection you don’t need IP assigned to eth1 interfaces.
Check if eth1 interface is UP on the new compute node after adding it – this was common error I used to encounter many times.
Hi there,
After successful installation, I got the error message when I’m trying to check Hypervisors from the dashboard, “Error: Unable to retrieve hypervisor information.” Could you please help me to solve this error?
Thanks in advance
Hi Anario
Perform some commands to check the connectivity, I would start from below commands:
[root@controller ~]# source /root/keystonerc_admin
[root@controller ~(keystone_admin)]# nova host-list
+————+————-+———-+
| host_name | service | zone |
+————+————-+———-+
| controller | cert | internal |
| controller | consoleauth | internal |
| controller | scheduler | internal |
| controller | conductor | internal |
| compute | compute | nova |
+————+————-+———-+
[root@controller ~(keystone_admin)]# nova service-list
+—-+——————+————+———-+———+——-+—————————-+—————–+
| Id | Binary | Host | Zone | Status | State | Updated_at | Disabled Reason |
+—-+——————+————+———-+———+——-+—————————-+—————–+
| 1 | nova-cert | controller | internal | enabled | up | 2017-04-10T20:37:53.000000 | – |
| 2 | nova-consoleauth | controller | internal | enabled | up | 2017-04-10T20:37:52.000000 | – |
| 5 | nova-scheduler | controller | internal | enabled | up | 2017-04-10T20:37:53.000000 | – |
| 6 | nova-conductor | controller | internal | enabled | up | 2017-04-10T20:37:52.000000 | – |
| 7 | nova-compute | compute | nova | enabled | up | 2017-04-10T20:37:55.000000 | – |
+—-+——————+————+———-+———+——-+—————————-+—————–+
service-list should give you info about statuses of compute services, perhaps message broker isn’t working properly.
Hope it will help you.
BR
Grzegorz Juszczak
Hi,
I have a questions, let’s say new node(192.168.2.8) has 3TB of hard disk space, and 192.168.2.5 has 1TB of hard disk space, after added new node(192.168.2.8), i should have total 4TB of hard disk space to create openstack new instance? If no, how to combine the server’s hard disk and check how much of disk space available?
Thanks in advance
Can you please write a post for how to deploy manually openstack??
Thanks you
Hi Karan
Writing a post about manual OpenStack installation service by service is like writing a book, it would take months for me to finish it…so, I’m afraid I am not going to write such article. All the information about manual OpenStack installation you can find on RDO website.
Thanks You…
Thanks for this tutorial. now i see: config_compute_hosts = put all compute node (before + after). exclude = put configured node. I tried the tutorial at https://www.rdoproject.org/install/adding-a-compute-node/, confused which node to put if more than one compute node.
one more thing. Do i really need to configure the interface on each additional compute node if i already configured neutron in the controller with external network as in https://www.rdoproject.org/networking/neutron-with-existing-external-network/ ? because in the first link i gave doesn’t require the configuration you mention. Thanks in advance.
Hi
let’s say you have three nodes in your OpenStack environment, that is: one controller node 192.168.2.29 and two compute nodes: 192.168.2.30, 192.168.2.31. Now you want to add the third compute node: 192.168.2.32, then I would do:
CONFIG_COMPUTE_HOSTS=192.168.2.30,192.168.2.31,192.168.2.32
EXCLUDE_SERVERS=192.168.2.29,192.168.2.30,192.168.2.31
Regarding second question, you need to set up br-ex on controller node only, don’t need to set it up on compute nodes.
Hello Grzegorz,
First of all ,I want to thank you for this great and straightforward tutorial. I have followed up the steps to add a new nova compute host to my packstack allinone deployment which is running on rhel guest server.
However, I would like to highlight an item which I think will be helpful people who are newbies at openstack like me.
As an initial step,I have modified my answer file and triggerred the packstack with this new answer file to add new nova compute after enabling all corresponding repos at nova compute host server.
Each attempt got stuck at “Applying 10.201.9.58_compute.pp ” . In order to move forward I have investigated the logs and figured out that new nova compute host can not reach the controller due to 5672 port access was blocked via IPTABLES rules. I have added the rule and retried ,this time installation stucked due to mysql connection issue.
As my environment is a test-only, I have stopped iptables service at controller node and completed the operation without any issue in couple of minutes.
I just want to share my experience and let nevbies to know they should consider the iptables rules during extension of openstack modules.
Thank you
Hi Oktay
Thanks for remark, you might be right regarding those iptables issues, OpenStack is evolving very fast and even I am not able to track all those changes. I wrote this article a while ago, OpenStack has changed since then.
hi Grzegorz Juszczak,
i have tried to add compute nodes via answer file. but it got stucked into “Applying 192.168.208.29_compute.pp” even after 48 hours as well. Thanks in advanced
Thanks a lot Oktay Esgul and Grzegorz Juszczak, after open the 5672 and mysql port on controller, new compute is added. such blogs are awesome. Thanks again
Hi,
I mixed them up, why did you add the server 192.168.2.5 that was excluded once again? It is a typo or something like that? Could you please explain it?
EXCLUDE_SERVERS=192.168.2.4,192.168.2.5
CONFIG_COMPUTE_HOSTS=192.168.2.5,192.168.2.8
Hi Hermes
There is no typo here, it’s very simple:
– CONFIG_COMPUTE_HOSTS describes what are the IP addresses of my Compute nodes.
– EXCLUDE_SERVERS means don’t install/reinstall these servers because they have been installed properly.
Combining both parameters mean that my Computes have IPs accordingly 192.168.2.5 and 192.168.2.8, but the one with IP 192.168.2.5 has been installed previously and I don’t want it to be reinstalled, because for example it hosts some Instances / VMs that I don’t want to loose.