
Using a high-availability LAMP (Linux Apache MySQL/MariaDB PHP) server may totally eliminate the risk of server’s downtime, which can be crucial in case of a production HTTP server, serving critical business application. We can set a redundant, fully functional, high-avalability production HTTP server for free, using well known and proven technologies like Apache server, MariaDB/Galera cluster software and HAProxy load balancer.
Galera Cluster Setup
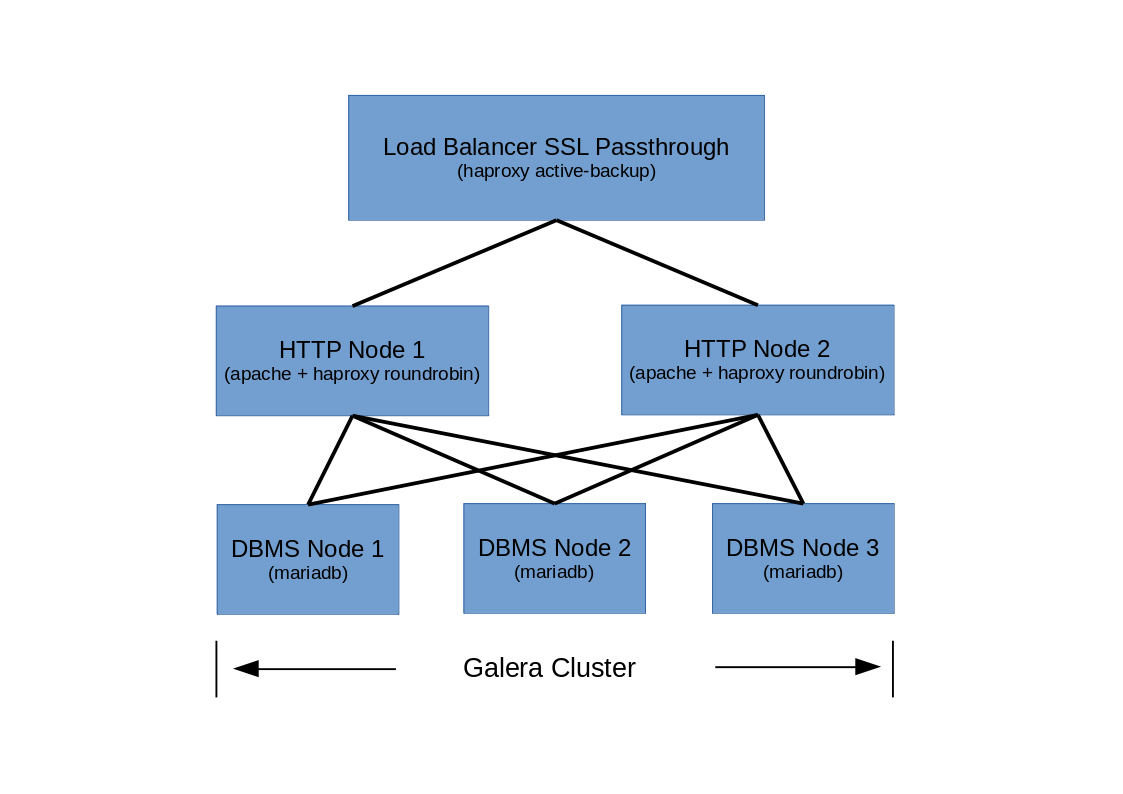
The example redundant solution presented in this article consists of:
- 1 x Load Balancer (based on HAProxy towards HTTP Cluster Nodes, working in Active – Backup and SSL Passthrough Mode)
- 2 x HTTP Cluster Node (powered by Apache server, with HAProxy towards Galera Cluster Nodes, working in Balance – Roundrobin Mode)
- 3 x Galera Cluster DBMS Node (based on MariaDB)
Test environment:
192.168.2.100 – cluster-load-balancer (CentOS 7.6 x86_64 / 1 x 2.4GHz / 2048MB RAM / 1 x NIC)
192.168.2.101 – cluster-http-1 (CentOS 7.6 x86_64 / 1 x 2.4GHz / 2048MB RAM / 1 x 1Gbit/s)
192.168.2.102 – cluster-http-2 (CentOS 7.6 x86_64 / 1 x 2.4GHz / 2048MB RAM / 1 x 1Gbit/s)
192.168.2.103 – cluster-dbms-1 (CentOS 7.6 x86_64 / 1 x 2.4GHz / 2048MB RAM / 1 x 1Gbit/s)
192.168.2.104 – cluster-dbms-2 (CentOS 7.6 x86_64 / 1 x 2.4GHz / 2048MB RAM / 1 x 1Gbit/s)
192.168.2.105 – cluster-dbms-3 (CentOS 7.6 x86_64 / 1 x 2.4GHz / 2048MB RAM / 1 x 1Gbit/s)
Cluster’s Workflow and Operating Mode
Brief workflow description of a presented setup:
- Viewer connects to Load Balancer’s IP address, acting as an Apache application front end’s IP. Load Balancer’s HAProxy forwards HTTPS (TCP/443) request as it is, however when it receives HTTP (TCP/80) request, the request is changed into a HTTPS and then forwarded to HTTP Cluster Node using HTTPS protocol, since both HTTP Cluster Nodes are configured to accept HTTPS traffic only – this mode of HAProxy operation is called SSL Passthrough
- Load Balancer HAProxy config file includes IP addresses of two HTTP Cluster Nodes, working in active-backup mode. That means, if cluster-node-1 is online and operational, request is forwarded to that node, if not, HAProxy will forward request to a backup node, which is cluster-node-2.
- Both HTTP Cluster Nodes, active and backup have their own instance of HAPRoxy installed and configured towards three Galera DBMS nodes, running MariaDB 10.4. Each HTTP Cluster Node is connected to all (three) Galera DBMS Nondes. HAProxy on each HTTP Cluster Node is configured to forward MySQL requests to equally to each DBMS Node by means of Roundrobin Mode.
- All Galera DBMS Nodes are connected together in active-active mode. If the database is altered on particular DBMS Node, the other DBMS Nodes are synchronized right away.
Cluster’s Fault Tolerance
To take full advantage of Apache-Galera cluster and provide high level of fault tolerance, it is important to distribute all cluster nodes across two datacenter locations or hosting providers, if possible – this approach ensures cluster’s geo-redundancy. If you are planning to deploy the whole cluster in virtual environment (Xen, KVM, OpenStack, VMware, etc…), distribute cluster virtual nodes across multiple physical vHosts to eliminate bare metal failure factor.
Proposed cluster node deployment across two zones to provide geo-redundancy and/or fault tolerance:
- zone 1 (vHost bare metal server, datacenter, hosting provider): cluster-load-balancer, cluster-node-1, cluster-dbms-1
- zone 2 (vHost bare metal server, datacenter, hosting provider): cluster-node-2, cluster-dbms-2, cluster-dbms-3
Disadvantages
Like any other solution, this one has some disadvantage as well. Load Balancer Node is not redundant in any way, since the application has to have a single point of access which is Load Balancer’s IP. And since we are not using here any sophisticated cluster solution, like Veritas or Pacemaker with their VIP, any failure of our cluster-load-balancer node will result in service outage. The good news though is that Load Balancer is based on a single HAProxy config file, so the whole node can be restored very quickly. Moreover, if the cluster is deployed in virtual environmnet, taking snapshot of working cluster-load-balancer virtualized node is a good practice, in case the node fails and has to be brought up quickly.
Install and configure MariaDB 10.4 Galera Cluster on three CentOS 7 DBMS nodes
We will start setup of our cluster from the installation of three Galera DBMS nodes based on MariaDB 10.4.2, according to the following steps:
1. Unlock SELinux MySQL Context for MariaDB (all DBMS nodes)
I have SELinux in Enforcing Mode on all my DBMS nodes, so I need to open MySQL SELinux context in order to be able to connect to MariaDB.
[root@cluster-dbms-1 ~]# yum install policycoreutils-python
[root@cluster-dbms-1 ~]# semanage permissive -a mysqld_t
Repeat the above commands on the remaining DBMS nodes.
2. Open Firewall ports for MariaDB and Galera Cluster (all DBMS nodes)
We need to open few ports to let our cluster communicate with other nodes:
- 3306/TCP – client connections
- 4567/TCP/UDP – replication traffic, UDP also needed for multicast replication
- 4568/TCP – incremental state transfer
- 4444/TCP – state snapshot transfer
Make sure, which zone your network interface belongs to:
[root@cluster-dbms-1 ~]# firewall-cmd --get-zone-of-interface eth0
public
Now open the ports for specified firewall zone (port 3306/TCP should be open after we install MariaDB-server RPM package, anyway I am opening it here too, just in case):
[root@cluster-dbms-1 ~]# firewall-cmd --zone=public --add-port=3306/tcp --permanent
[root@cluster-dbms-1 ~]# firewall-cmd --zone=public --add-port=4567/tcp --permanent
[root@cluster-dbms-1 ~]# firewall-cmd --zone=public --add-port=4567/udp --permanent
[root@cluster-dbms-1 ~]# firewall-cmd --zone=public --add-port=4568/tcp --permanent
[root@cluster-dbms-1 ~]# firewall-cmd --zone=public --add-port=4444/tcp --permanent
Reload firewalld configuration:
[root@cluster-dbms-1 ~]# firewall-cmd --reloadNow verify open ports:
[root@cluster-dbms-1 ~]# firewall-cmd --list-ports
3306/tcp 4567/tcp 4567/udp 4568/tcp 4444/tcp
Repeat the above commands on the remaining DBMS nodes.
3. Create MariaDB 10.4.2 repository file for YUM (all DBMS nodes)
As mentioned earlier in this post, we are going to install MariaDB 10.4.2, let’s create repo file for this particular version:
[root@cluster-dbms-1 ~]# touch /etc/yum.repos.d/MariaDB.repoEdit MariaDB.repo and modify the file to look like below:
[mariadb]
name = MariaDB-10.4.2
enabled=1
baseurl=http://yum.mariadb.org/10.4.2/centos7-amd64
gpgkey=https://yum.mariadb.org/RPM-GPG-KEY-MariaDB
gpgcheck=1
Refresh repo list to check, if new mariadb repo is present and accessible:
[root@cluster-dbms-1 ~]# yum repolistRepeat the above commands on the remaining DBMS nodes.
4. Install and pre-configure MariaDB 10.4.2 with YUM (all DBMS nodes)
Install MariaDB server and client packages:
[root@cluster-dbms-1 ~]# yum install MariaDB-server MariaDB-clientNote: MariaDB-server package includes galera-4 package as a dependency, so we don’t need to install it separately to have Galera functionality along with MariaDB server.
Now we need to pre-configure our MariaDB database.
Start the database server:
[root@cluster-dbms-1 ~]# systemctl start mariadbSet root password:
[root@cluster-dbms-1 ~]# /usr/bin/mysqladmin -u root password Launch initial configuration:
[root@cluster-dbms-1 ~]# /usr/bin/mysql_secure_installationWhen prompted, type root password and answer initial configuration questions:
...
Enter current password for root (enter for none):
OK, successfully used password, moving on...
...
Change the root password? [Y/n] n
...
Remove anonymous users? [Y/n] y
...
Disallow root login remotely? [Y/n] n
...
Remove test database and access to it? [Y/n] y
...
Reload privilege tables now? [Y/n] y
...
Next, stop the database server:
[root@cluster-dbms-1 ~]# systemctl stop mariadbRepeat the above commands on the remaining DBMS nodes.
5. Prepare Galera cluster config file
To launch a basic Galera cluster setup, we need to make just a few modifications in galera section in config file /etc/my.cnf.d/server.cnf for each Galera cluster node and set at least the following mandatory parameters:
- wsrep_on – must be set to ON, to let the particular node join the cluster
- wsrep_provider – defines the location of galera library, i.e. /usr/lib64/galera-4/libgalera_smm.so
- wsrep_cluster_address – the IP addresses of all Galera cluster nodes
- binlog_format – format of binary log, available options are: row (choose it, if you execute many statements that don’t affect any rows), statement (choose it, if you execute single statements that update many rows), mixed (choose it, if you execute statements that take a long time to complete). MariaDB includes the mysqlbinlog utility that you can use to display binary log events in a human-readable format.
- default_storage_engine – options are: InnoDB (default engine from version 10.2), MyISAM (legacy MySQL engine), Aria (modern improvement of MyISAM)
- innodb_autoinc_lock_mode – InnoDB auto-increment lock mode, if binlog_format=row
, it is recommended to set this parameter to 2 (intrerleaved mode), whereas if binlog_format=statement, it is recommended to set it to 1 (consecutive mode)
It is also worth setting the below optional parameters:
- wsrep_cluster_name – name of the cluster, needs to be identical on all nodes that belong to a particular cluster
- wsrep_node_address – specifies the node’s IP address
Below I present the complete server.cnf config files I use for my DBMS nodes.
DBMS_1 node configuration:
[server]

[mysqld]

[galera]
wsrep_on=ON
wsrep_provider=/usr/lib64/galera-4/libgalera_smm.so
wsrep_cluster_address="gcomm://192.168.2.103,192.168.2.104,192.168.2.105"
binlog_format=row
default_storage_engine=InnoDB
innodb_autoinc_lock_mode=2
wsrep_cluster_name=tuxfixer-cluster
wsrep_node_address="192.168.2.103"

[embedded]

[mariadb]

[mariadb-10.4]
DBMS_2 node configuration:
[server]

[mysqld]

[galera]
wsrep_on=ON
wsrep_provider=/usr/lib64/galera-4/libgalera_smm.so
wsrep_cluster_address="gcomm://192.168.2.103,192.168.2.104,192.168.2.105"
binlog_format=row
default_storage_engine=InnoDB
innodb_autoinc_lock_mode=2
wsrep_cluster_name=tuxfixer-cluster
wsrep_node_address="192.168.2.104"

[embedded]

[mariadb]

[mariadb-10.4]
DBMS_3 node configuration:
[server]

[mysqld]

[galera]
wsrep_on=ON
wsrep_provider=/usr/lib64/galera-4/libgalera_smm.so
wsrep_cluster_address="gcomm://192.168.2.103,192.168.2.104,192.168.2.105"
binlog_format=row
default_storage_engine=InnoDB
innodb_autoinc_lock_mode=2
wsrep_cluster_name=tuxfixer-cluster
wsrep_node_address="192.168.2.105"

[embedded]

[mariadb]

[mariadb-10.4]
6. Launch Galera cluster on three CentOS 7 based DBMS nodes
Galera cluster should be launched when all nodes are down, that is MariaDB service should not be running on any node. To start the cluster, we need to bootstrap the first node, that is DBMS-1 node and start MariaDB service on the remaining nodes: DBMS-2 and DBMS-3.
Bootstrap the cluster on DBMS_1 node:
[root@cluster-dbms-1 ~]# galera_new_clusterCheck MariaDB status to verify, that the cluster was bootstrapped and the first node joined the cluster group:
[root@cluster-dbms-1 ~]# systemctl status mariadb
● mariadb.service - MariaDB 10.4.2 database server
   Loaded: loaded (/usr/lib/systemd/system/mariadb.service; enabled; vendor preset: disabled)
  Drop-In: /etc/systemd/system/mariadb.service.d
           └─migrated-from-my.cnf-settings.conf
   Active: active (running) since Fri 2019-05-31 16:12:05 EDT; 6s ago
     Docs: man:mysqld(8)
           https://mariadb.com/kb/en/library/systemd/
  Process: 25198 ExecStartPost=/bin/sh -c systemctl unset-environment _WSREP_START_POSITION (code=exited, status=0/SUCCESS)
  Process: 25088 ExecStartPre=/bin/sh -c [ ! -e /usr/bin/galera_recovery ] && VAR= ||   VAR=`/usr/bin/galera_recovery`; [ $? -eq 0 ]   && systemctl set-environment _WSREP_START_POSITION=$VAR || exit 1 (code=exited, status=0/SUCCESS)
  Process: 25086 ExecStartPre=/bin/sh -c systemctl unset-environment _WSREP_START_POSITION (code=exited, status=0/SUCCESS)
 Main PID: 25160 (mysqld)
   Status: "Taking your SQL requests now..."
   CGroup: /system.slice/mariadb.service
           └─25160 /usr/sbin/mysqld --wsrep-new-cluster --wsrep_start_position=00000000-0000-0000-0000-000000000000:-1

May 31 16:12:05 cluster-dbms-1 mysqld[25160]: 2019-05-31 16:12:05 3 [Note] WSREP: wsrep_notify_cmd is not defined, skipping notification.
May 31 16:12:05 cluster-dbms-1 mysqld[25160]: 2019-05-31 16:12:05 0 [Note] Reading of all Master_info entries succeded
May 31 16:12:05 cluster-dbms-1 mysqld[25160]: 2019-05-31 16:12:05 0 [Note] Added new Master_info '' to hash table
May 31 16:12:05 cluster-dbms-1 mysqld[25160]: 2019-05-31 16:12:05 0 [Note] /usr/sbin/mysqld: ready for connections.
May 31 16:12:05 cluster-dbms-1 mysqld[25160]: Version: '10.4.2-MariaDB'  socket: '/var/lib/mysql/mysql.sock'  port: 3306  MariaDB Server
May 31 16:12:05 cluster-dbms-1 systemd[1]: Started MariaDB 10.4.2 database server.
May 31 16:12:05 cluster-dbms-1 mysqld[25160]: 2019-05-31 16:12:05 3 [Note] WSREP: Server cluster-dbms-1 synced with group
May 31 16:12:05 cluster-dbms-1 mysqld[25160]: 2019-05-31 16:12:05 3 [Note] WSREP: Server status change joined -> synced
May 31 16:12:05 cluster-dbms-1 mysqld[25160]: 2019-05-31 16:12:05 3 [Note] WSREP: Synchronized with group, ready for connections
May 31 16:12:05 cluster-dbms-1 mysqld[25160]: 2019-05-31 16:12:05 3 [Note] WSREP: wsrep_notify_cmd is not defined, skipping notification.
Now launch MariaDB service on DBMS_2 node:
[root@cluster-dbms-2 ~]# systemctl start mariadbVerify, if DBMS_2 joined the group:
[root@cluster-dbms-2 ~]# systemctl status mariadb
● mariadb.service - MariaDB 10.4.2 database server
   Loaded: loaded (/usr/lib/systemd/system/mariadb.service; enabled; vendor preset: disabled)
  Drop-In: /etc/systemd/system/mariadb.service.d
           └─migrated-from-my.cnf-settings.conf
   Active: active (running) since Fri 2019-05-31 16:12:34 EDT; 6s ago
     Docs: man:mysqld(8)
           https://mariadb.com/kb/en/library/systemd/
  Process: 25336 ExecStartPost=/bin/sh -c systemctl unset-environment _WSREP_START_POSITION (code=exited, status=0/SUCCESS)
  Process: 25122 ExecStartPre=/bin/sh -c [ ! -e /usr/bin/galera_recovery ] && VAR= ||   VAR=`/usr/bin/galera_recovery`; [ $? -eq 0 ]   && systemctl set-environment _WSREP_START_POSITION=$VAR || exit 1 (code=exited, status=0/SUCCESS)
  Process: 25120 ExecStartPre=/bin/sh -c systemctl unset-environment _WSREP_START_POSITION (code=exited, status=0/SUCCESS)
 Main PID: 25193 (mysqld)
   Status: "Taking your SQL requests now..."
   CGroup: /system.slice/mariadb.service
           └─25193 /usr/sbin/mysqld --wsrep_start_position=00000000-0000-0000-0000-000000000000:-1

May 31 16:12:34 cluster-dbms-2 mysqld[25193]: Version: '10.4.2-MariaDB'  socket: '/var/lib/mysql/mysql.sock'  port: 3306  MariaDB Server
May 31 16:12:34 cluster-dbms-2 mysqld[25193]: 2019-05-31 16:12:34 0 [Note] WSREP: 1.0 (cluster-dbms-2): State transfer from 0.0 (cluster-dbms-1) complete.
May 31 16:12:34 cluster-dbms-2 mysqld[25193]: 2019-05-31 16:12:34 0 [Note] WSREP: Shifting JOINER -> JOINED (TO: 2)
May 31 16:12:34 cluster-dbms-2 mysqld[25193]: 2019-05-31 16:12:34 0 [Note] WSREP: Member 1.0 (cluster-dbms-2) synced with group.
May 31 16:12:34 cluster-dbms-2 mysqld[25193]: 2019-05-31 16:12:34 0 [Note] WSREP: Shifting JOINED -> SYNCED (TO: 2)
May 31 16:12:34 cluster-dbms-2 mysqld[25193]: 2019-05-31 16:12:34 3 [Note] WSREP: Server cluster-dbms-2 synced with group
May 31 16:12:34 cluster-dbms-2 mysqld[25193]: 2019-05-31 16:12:34 3 [Note] WSREP: Server status change joined -> synced
May 31 16:12:34 cluster-dbms-2 mysqld[25193]: 2019-05-31 16:12:34 3 [Note] WSREP: Synchronized with group, ready for connections
May 31 16:12:34 cluster-dbms-2 mysqld[25193]: 2019-05-31 16:12:34 3 [Note] WSREP: wsrep_notify_cmd is not defined, skipping notification.
May 31 16:12:34 cluster-dbms-2 systemd[1]: Started MariaDB 10.4.2 database server.
Finally, launch MariaDB service on DBMS_3 node:
[root@cluster-dbms-3 ~]# systemctl start mariadbVerify DBMS_3 node:
[root@cluster-dbms-3 ~]# systemctl status mariadb
● mariadb.service - MariaDB 10.4.2 database server
   Loaded: loaded (/usr/lib/systemd/system/mariadb.service; enabled; vendor preset: disabled)
  Drop-In: /etc/systemd/system/mariadb.service.d
           └─migrated-from-my.cnf-settings.conf
   Active: active (running) since Fri 2019-05-31 16:13:02 EDT; 7s ago
     Docs: man:mysqld(8)
           https://mariadb.com/kb/en/library/systemd/
  Process: 25255 ExecStartPost=/bin/sh -c systemctl unset-environment _WSREP_START_POSITION (code=exited, status=0/SUCCESS)
  Process: 25041 ExecStartPre=/bin/sh -c [ ! -e /usr/bin/galera_recovery ] && VAR= ||   VAR=`/usr/bin/galera_recovery`; [ $? -eq 0 ]   && systemctl set-environment _WSREP_START_POSITION=$VAR || exit 1 (code=exited, status=0/SUCCESS)
  Process: 25039 ExecStartPre=/bin/sh -c systemctl unset-environment _WSREP_START_POSITION (code=exited, status=0/SUCCESS)
 Main PID: 25112 (mysqld)
   Status: "Taking your SQL requests now..."
   CGroup: /system.slice/mariadb.service
           └─25112 /usr/sbin/mysqld --wsrep_start_position=00000000-0000-0000-0000-000000000000:-1

May 31 16:13:02 cluster-dbms-3 mysqld[25112]: Version: '10.4.2-MariaDB'  socket: '/var/lib/mysql/mysql.sock'  port: 3306  MariaDB Server
May 31 16:13:02 cluster-dbms-3 mysqld[25112]: 2019-05-31 16:13:02 0 [Note] WSREP: 2.0 (cluster-dbms-3): State transfer from 0.0 (cluster-dbms-1) complete.
May 31 16:13:02 cluster-dbms-3 mysqld[25112]: 2019-05-31 16:13:02 0 [Note] WSREP: Shifting JOINER -> JOINED (TO: 3)
May 31 16:13:02 cluster-dbms-3 mysqld[25112]: 2019-05-31 16:13:02 0 [Note] WSREP: Member 2.0 (cluster-dbms-3) synced with group.
May 31 16:13:02 cluster-dbms-3 mysqld[25112]: 2019-05-31 16:13:02 0 [Note] WSREP: Shifting JOINED -> SYNCED (TO: 3)
May 31 16:13:02 cluster-dbms-3 mysqld[25112]: 2019-05-31 16:13:02 3 [Note] WSREP: Server cluster-dbms-3 synced with group
May 31 16:13:02 cluster-dbms-3 mysqld[25112]: 2019-05-31 16:13:02 3 [Note] WSREP: Server status change joined -> synced
May 31 16:13:02 cluster-dbms-3 mysqld[25112]: 2019-05-31 16:13:02 3 [Note] WSREP: Synchronized with group, ready for connections
May 31 16:13:02 cluster-dbms-3 mysqld[25112]: 2019-05-31 16:13:02 3 [Note] WSREP: wsrep_notify_cmd is not defined, skipping notification.
May 31 16:13:02 cluster-dbms-3 systemd[1]: Started MariaDB 10.4.2 database server.
7. Verify Galera cluster status
Now we need to ensure, that the cluster is synced and fully operational.
Log in to the database on DBMS_1 node, using the password we have set before:
[root@cluster-dbms-1 ~]# mysql -u root -pCheck, how many cluster nodes this particular node is aware of:
MariaDB [(none)]> SHOW STATUS LIKE 'wsrep_cluster_size';
+--------------------+-------+
| Variable_name      | Value |
+--------------------+-------+
| wsrep_cluster_size | 3     |
+--------------------+-------+
This node reports, that there are currently three DBMS nodes in the cluster, as expected.
Ensure that this node is synced with the cluster group:
MariaDB [(none)]> SHOW STATUS LIKE 'wsrep_local_state_comment';
+---------------------------+--------+
| Variable_name             | Value  |
+---------------------------+--------+
| wsrep_local_state_comment | Synced |
+---------------------------+--------+
Repeat the above verification on the remaining DBMS nodes.
If all DBMS nodes are in synced state, our Galera cluster is operational and ready for connections.
Install and configure two active-backup HTTP cluster nodes with HAProxy for Galera connectivity
Once our Galera cluster is complete, we can proceed with Apache HTTP cluster nodes installation. In this scenario both HTTP nodes work in active-backup mode and we are not using here any Apache dedicated cluster software. The HTTP cluster mechanism is managed here only by HAProxy Load Balancer, which sends HTTP/HTTPS traffic first to the cluster-http-1 node, and when it fails, the traffic is then forwarded to cluster-http-2 node.
1. Allow incoming traffic from Load Balancer node only (both HTTP nodes)
Direct access to any of the HTTP nodes, especially to the backup node and bypassing the Load Balancer, would totally disrupt the Apache cluster operation. That’s why we allow for connections from Load Balancer on port 443/TCP only, using the rich rule:
[root@cluster-http-1 ~]# firewall-cmd --permanent --zone=public --add-rich-rule='rule family=ipv4 source address=192.168.2.100/24 port protocol=tcp port=443 accept'
success
[root@cluster-http-1 ~]# firewall-cmd --reload
success
Verify rich rule:
[root@cluster-http-1 ~]# firewall-cmd --list-rich-rules
rule family="ipv4" source address="192.168.2.100/24" port port="443" protocol="tcp" accept
Repeat this step on the second HTTP node.
2. Unlock SELinux context for HAProxy (both HTTP nodes)
Configure SELinux to allow HAProxy to bind the socket at any port:
[root@cluster-http-1 haproxy]# setsebool haproxy_connect_any onRepeat this step on the second HTTP node.
3. Install Apache and PHP with YUM (both HTTP nodes)
Our cluster is going to be an alternative for single LAMP (Linux Apache MySQL/MariaDB PHP) server. That’s why we will start from installing HTTP, PHP and HAProxy packages on both nodes:
[root@cluster-http-1 ~]# yum install httpd mod_ssl php haproxyRepeat this step on the second HTTP node.
4. Enable SSL Multi-Domain SAN certificate for Apache server (both HTTP nodes)
Our both HTTP nodes are supposed to work in SSL Passthrough mode in cooperation with HTTP Load Balancer node, that means we need to place SSL certificates on both HTTP nodes.
Note: for the purpose of this article I am using self-sgined SSL certificate, but in production environment you should use commercial SSL Multi-Domain SAN (Subject Alternative Name) certificate issued for your domain and first-level subdomains which point to your cluster front-end nodes, that is cluster-load-balancer, cluster-http-1 and cluster-http-2.
Example SSL SAN certification:
- domain: example.com
- cluster-load-balancer FQDN: myapp.example.com
- cluster-http-1 FQDN: cl1.example.com
- cluster-http-2 FQDN: cl2.example.com
Create directory for SSL certificate and the key on cluster-http-1 node:
[root@cluster-http-1 httpd]# mkdir /etc/httpd/sslUpload SSL certificate and the key to /etc/httpd/ssl directory:
[root@cluster-http-1 ssl]# ls -l /etc/httpd/ssl
total 8
-rw-r--r--. 1 root root 1395 Jun  2 12:26 example.crt
-rw-------. 1 root root 1679 Jun  2 12:26 example.key
Now edit /etc/httpd/conf.d/ssl.conf file, find and modify the below lines to point to the certificate and the key:
SSLEngine on
SSLCertificateFile /etc/httpd/ssl/example.crt
SSLCertificateKeyFile /etc/httpd/ssl/example.key
Repeat this step on the second HTTP node.
5. Launch and enable Apache server (both HTTP nodes)
[root@cluster-http-1 ~]# systemctl start httpd
[root@cluster-http-1 ~]# systemctl enable httpd
Created symlink from /etc/systemd/system/multi-user.target.wants/httpd.service to /usr/lib/systemd/system/httpd.service.
Repeat this step on the second HTTP node.
6. Configure HAProxy for Galera cluster connectivity (both HTTP nodes)
There are several balance algorithms supported by HAProxy service, in this article I am using roundrobin algorithm, in which each server is used in turns according to the given weights, and since I am configuring weights equally, the processing time will remain equally distributed across all the DBMS nodes.
Edit /etc/haproxy/haproxy.cfg file on cluster-http-1 node and add Galera load balancer backend section at the bottom:
#---------------------------------------------------------------------
# Global settings
#---------------------------------------------------------------------
global
    # to have these messages end up in /var/log/haproxy.log you will
    # need to:
    #
    # 1) configure syslog to accept network log events.  This is done
    #    by adding the '-r' option to the SYSLOGD_OPTIONS in
    #    /etc/sysconfig/syslog
    #
    # 2) configure local2 events to go to the /var/log/haproxy.log
    #   file. A line like the following can be added to
    #   /etc/sysconfig/syslog
    #
    #    local2.*                       /var/log/haproxy.log
    #
    log         127.0.0.1 local2

    chroot      /var/lib/haproxy
    pidfile     /var/run/haproxy.pid
    maxconn     4000
    user        haproxy
    group       haproxy
    daemon

    # turn on stats unix socket
    stats socket /var/lib/haproxy/stats

#---------------------------------------------------------------------
# common defaults that all the 'listen' and 'backend' sections will
# use if not designated in their block
#---------------------------------------------------------------------
defaults
    mode                    http
    log                     global
    option                  tcplog
    option                  dontlognull
    option http-server-close
    option                  redispatch
    retries                 3
    timeout http-request    10s
    timeout queue           1m
    timeout connect         10s
    timeout client          1m
    timeout server          1m
    timeout http-keep-alive 10s
    timeout check           10s
    maxconn                 3000

#---------------------------------------------------------------------
# load balancer for galera cluster
#---------------------------------------------------------------------
listen galera 127.0.0.1:3306
     balance roundrobin
     mode tcp
     option tcpka
     server cluster-dbms-1 192.168.2.103:3306 check weight 1
     server cluster-dbms-2 192.168.2.104:3306 check weight 1
     server cluster-dbms-3 192.168.2.105:3306 check weight 1
As you have probably noticed, the Galera backend listens for incoming traffic on local network interface (127.0.0.1), that means, during application deployment in future, when prompted for MariaDB physical location, you should choose localhost or 127.0.0.1.
Start and enable HAProxy service on cluster-http-1 node:
[root@cluster-http-1 haproxy]# systemctl start haproxy
[root@cluster-http-1 haproxy]# systemctl enable haproxy
Created symlink from /etc/systemd/system/multi-user.target.wants/haproxy.service to /usr/lib/systemd/system/haproxy.service.
Verify the service:
[root@cluster-http-1 haproxy]# systemctl status haproxy
● haproxy.service - HAProxy Load Balancer
   Loaded: loaded (/usr/lib/systemd/system/haproxy.service; enabled; vendor preset: disabled)
   Active: active (running) since Sun 2019-06-02 10:29:56 EDT; 1s ago
 Main PID: 10321 (haproxy-systemd)
   CGroup: /system.slice/haproxy.service
           ├─10321 /usr/sbin/haproxy-systemd-wrapper -f /etc/haproxy/haproxy.cfg -p /run/haproxy.pid
           ├─10322 /usr/sbin/haproxy -f /etc/haproxy/haproxy.cfg -p /run/haproxy.pid -Ds
           └─10323 /usr/sbin/haproxy -f /etc/haproxy/haproxy.cfg -p /run/haproxy.pid -Ds

Jun 02 10:29:56 cluster-http-1 systemd[1]: Stopped HAProxy Load Balancer.
Jun 02 10:29:56 cluster-http-1 systemd[1]: Started HAProxy Load Balancer.
Jun 02 10:29:56 cluster-http-1 haproxy-systemd-wrapper[10321]: haproxy-systemd-wrapper: executing /usr/sbin/haproxy -f /etc/haproxy/haproxy.cfg -p /run/haproxy.pid -Ds
Repeat this step on the second HTTP node (using the same haproxy.cfg file).
Install HTTP SSL Passthrough Load Balancer on CentOS 7 based on HAProxy
Main HTTP Load Balancer configuration is very simple since it’s all about preparing HAProxy config file and launching the service. As mentioned at the very beginning, HTTP Load Balancer distributes HTTP/HTTPS requests in active-backup mode.
Note: although Load Balancer node redirects requests from viewers using HTTPS protocol, this node doesn’t require SSL certificate file to be installed on the host, so we are not going to install it here. The SSL certificates are installed on both HTTP nodes instead. However, SSL SAN Multi-Node certificate must include the Load Balancer node as well, otherwise, the web browsers will complain about an insecure connection.
1. Unlock SELinux context for HAProxy service
[root@cluster-load-balancer ~]# yum install policycoreutils-python
[root@cluster-load-balancer ~]# semanage permissive -a haproxy_t
2. Open ports on Firewall
In order to accept HTTP and HTTPS requests on Load Balancer, we need to open port 80/TCP and 443/TCP:
[root@cluster-load-balancer ~]# firewall-cmd --zone=public --add-port=80/tcp --permanent
success
[root@cluster-load-balancer ~]# firewall-cmd --zone=public --add-port=443/tcp --permanent
success
[root@cluster-load-balancer ~]# firewall-cmd --reload
3. Install HAProxy service
[root@cluster-load-balancer ~]# yum install haproxy4. Configure HAProxy service
Edit /etc/haproxy/haproxy.cfg config file and modify its content to look like below:
#---------------------------------------------------------------------
# Global settings
#---------------------------------------------------------------------
global
    # to have these messages end up in /var/log/haproxy.log you will
    # need to:
    #
    # 1) configure syslog to accept network log events.  This is done
    #    by adding the '-r' option to the SYSLOGD_OPTIONS in
    #    /etc/sysconfig/syslog
    #
    # 2) configure local2 events to go to the /var/log/haproxy.log
    #   file. A line like the following can be added to
    #   /etc/sysconfig/syslog
    #
    #    local2.*                       /var/log/haproxy.log
    #
    log         127.0.0.1 local2

    chroot      /var/lib/haproxy
    pidfile     /var/run/haproxy.pid
    maxconn     4000
    user        haproxy
    group       haproxy
    daemon

    # turn on stats unix socket
    stats socket /var/lib/haproxy/stats

#---------------------------------------------------------------------
# common defaults that all the 'listen' and 'backend' sections will
# use if not designated in their block
#---------------------------------------------------------------------
defaults
    mode                    http
    log                     global
    option                  httplog
    option                  dontlognull
    option http-server-close
    option forwardfor       except 127.0.0.0/8
    option                  redispatch
    retries                 3
    timeout http-request    10s
    timeout queue           1m
    timeout connect         10s
    timeout client          1m
    timeout server          1m
    timeout http-keep-alive 10s
    timeout check           10s
    maxconn                 3000

#---------------------------------------------------------------------
# main frontend which proxys to the backends
#---------------------------------------------------------------------
frontend http-traffic *:80
    redirect location https://myapp.example.com

frontend https-traffic *:443
    option tcplog
    mode tcp
    default_backend apache-nodes

#---------------------------------------------------------------------
# active-backup redirection between the various backends
#---------------------------------------------------------------------
backend apache-nodes
    mode tcp
    balance roundrobin
    option ssl-hello-chk
    server cl1.example.com 192.168.2.101:443 check
    server cl2.example.com 192.168.2.102:443 check backup
According to the above HAProxy config file, the Load Balancer accepts two protocols: HTTP on port 80/TCP and HTTPS on port 443/TCP. If the request arrives on port 80/TCP, it is captured by http-traffic frontend, then redirected to HTTPS, and finally captured by https-traffic frontend. The latter redirects it to apache-nodes backend, which works in active-backup mode, and the traffic is routed to cl1.example.com node. If the node is down, it is then routed to cl2.example.com.
5. Enable and launch HAProxy service on Load Balancer
Once our config file is done, we can launch and enable HAProxy service:
[root@cluster-load-balancer ~]# systemctl start haproxy
[root@cluster-load-balancer ~]# systemctl enable haproxy
Verify the service:
[root@cluster-load-balancer ~]# systemctl status haproxy
● haproxy.service - HAProxy Load Balancer
   Loaded: loaded (/usr/lib/systemd/system/haproxy.service; disabled; vendor preset: disabled)
   Active: active (running) since Wed 2019-06-05 17:37:56 EDT; 2s ago
 Main PID: 13240 (haproxy-systemd)
   CGroup: /system.slice/haproxy.service
           ├─13240 /usr/sbin/haproxy-systemd-wrapper -f /etc/haproxy/haproxy.cfg -p /run/haproxy.pid
           ├─13242 /usr/sbin/haproxy -f /etc/haproxy/haproxy.cfg -p /run/haproxy.pid -Ds
           └─13243 /usr/sbin/haproxy -f /etc/haproxy/haproxy.cfg -p /run/haproxy.pid -Ds

Jun 05 17:37:56 cluster-load-balancer systemd[1]: Stopped HAProxy Load Balancer.
Jun 05 17:37:56 cluster-load-balancer systemd[1]: Started HAProxy Load Balancer.
Jun 05 17:37:56 cluster-load-balancer haproxy-systemd-wrapper[13240]: haproxy-systemd-wrapper: executing /usr/sbin/haproxy -f /etc/haproxy/haproxy.cfg -p /run/haproxy.pid -Ds
Now access the Load Balancer from the web browser:
http://myapp.example.comYou should be redirected now to the first HTTP Apache node (if it’s up and operational), and see the Apache test screen. If your SSL SAN certificate has been properly issued and installed, the browser should describe the connection as secure.
How to gracefully shutdown the Apache Galera cluster
Once we have a working Apache/Galera cluster, it is very possible, that sooner or later we will have to power it off, i.e. for some maintenance break. Here is the procedure how to safely power off Apache/Galera cluster:
1. Stop Load Balancer’s HAProxy service to prevent visitors’ access to the application and the database
[root@cluster-load-balancer ~]# systemctl stop haproxy2. Stop Apache and HAProxy services on both HTTP nodes
[root@cluster-http-1 ~]# systemctl stop httpd
[root@cluster-http-1 ~]# systemctl stop haproxy
Repeat above step on the second HTTP node.
3. Begin the Galera cluster shutdown procedure from the last node.
Check the DBMS 3 node, if it’s synced with the cluster:
[root@cluster-dbms-3 ~]# mysql -u root -p
Enter password:
Welcome to the MariaDB monitor.  Commands end with ; or \g.
Your MariaDB connection id is 14
Server version: 10.4.2-MariaDB MariaDB Server

Copyright (c) 2000, 2018, Oracle, MariaDB Corporation Ab and others.

Type 'help;' or '\h' for help. Type '\c' to clear the current input statement.

MariaDB [(none)]> SHOW STATUS LIKE 'wsrep_local_state_comment';
+---------------------------+--------+
| Variable_name             | Value  |
+---------------------------+--------+
| wsrep_local_state_comment | Synced |
+---------------------------+--------+
1 row in set (0.002 sec)

MariaDB [(none)]> exit
Bye
Now stop MariaDB service:
[root@cluster-dbms-3 ~]# systemctl stop mariadbRepeat above step accordingly on the DBMS 2 and finally on the DBMS 1 node.
All the services on all nodes are stopped, you can now power off or reboot all the nodes, if required.
Thank you!
Please update the tutorial to the Centos 8 version.
Thanks for this.
How to make Load Balancer Node redundant ?
Hello Oliver
To make the Load Balancer node redundant you need to combine it with the Keepalived mechanism, it is then called HAProxy/Keepalived cluster and requires at least 2 redundant nodes, recommended 3 nodes.
please whisch database creadentials i need to add to my php application ? host ? user? and password.
i need to create a user and use any db ip as host ? or i need to use 127.0.0.1 or local host ?
thanks